Some years ago, I was involved with some other photographers in a project taking photographs of an old Great Western Railway goods shed dating back to the mid 19th century. I decided to try to make some exterior images that replicated an engineering drawing viewpoint as in an orthogonal projection.
GWR Goods Shed – What is Orthogonal Projection?
In engineering drawing, orthogonal projection creates two-dimensional drawings of a three-dimensional object by viewing it from different, perpendicular directions, such as the ends and side. It creates a series of flat views where all lines of sight are perpendicular to the projection plane.
GWR Goods Shed – Practicalities of Making a Photographic Orthogonal Projection
In order to achieve orthogonal projection photographically you must avoid showing any plane at right angles to the plane of the camera sensor, such as window reveals or side walls, door alcoves etc. Even small details like the end of a window sill should be avoided. But at the same time, the finished image needs to show all of the surface in an alcove facing the camera, such as a door and its frame, without cutting off one side, or other parts, due to the angle of view.
The practicalities of this mean that numerous images need to be taken and stitched together. You need an image with the camera exactly in line with each surface at right angles to the sensor plane to avoid showing it – that’s door and window reveals etc. And you need one centrally located for each surface within a recess to be sure to capture that recess from side to side and top to bottom. Then “all you have to do” is join them seamlessly together. You will need to do the stitching manually as you cannot rely on software to make the joins in precisely the right place. Details like the lining up of brick coursework are essential for a clean and realistic look.
Choose a dull day with diffused light to avoid having shadows spoiling the image.
If using a Zoom lens maintain the same focal length for all images. Use an f-stop that will ensure everything is in focus – some testing is advisable to be absolutely sure before starting to take the sequence. If possible, avoid a wide angle lens which may introduce distortions that make the stitching process more difficult. Something like a 50 mm lens is ideal. Maintain a constant distance from the subject as you take your images.
If you are only interested in the facade of the building then you can take the images from quite close. However if you wish to capture the roof details too, then you will need to be some distance away from the subject to avoid foreshortening the roof (see below). Some experimentation may be necessary to find the optimum distance. Use manual focus for consistency. A tripod will ensure that the camera height remains constant throughout the process; usually you will want the camera as high as possible.
GWR Goods Shed – Photographic Orthogonal Projection – The Realities
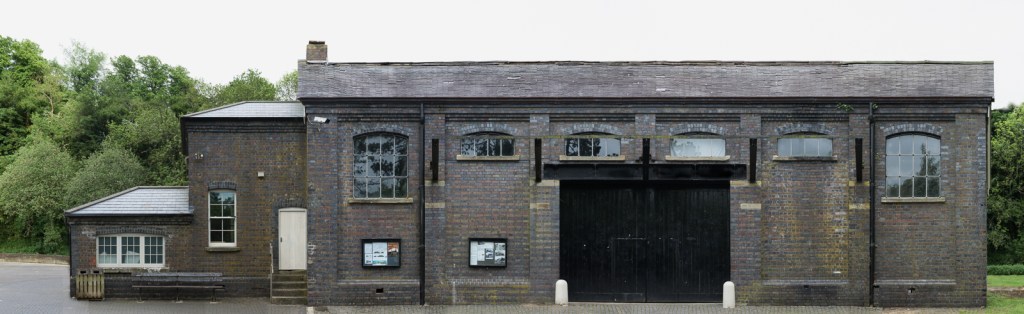
In my composite image of the goods shed above, 45 individual images make up the side elevation of the brickwork facade and the roof; the original file size is 13800px by 4236px.
The viewpoint on this side of the building foreshortens the roof. Due to all the nearby trees, it is impossible to find a viewpoint far enough away to obtain a good rendition of the roof in its proper proportion to the height of the walls. The eaves to ridge vertical dimension is a little more than half the height of the wall in reality.
For the roof tiles I had to eliminate the converging verticals of the individual tiles so that they all appeared rectangular, though the roof was in a bit of a state when the photos were taken and some tiles had slipped out of alignment or were missing.
I never made an attempt to tidy up the cobble stones in the foreground which would have required another set of images, but AI might do that for me now.
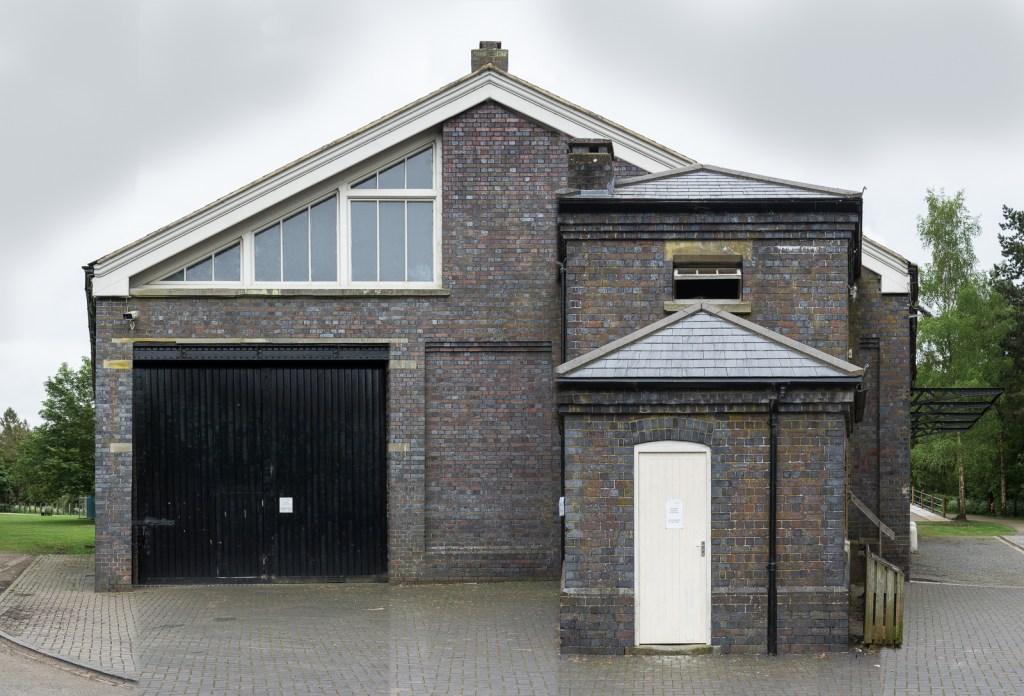
I used the same technique for the end elevation where you can see the relationship of roof height to wall height.

Leave a comment